As an affiliate, we may earn from qualifying purchases. This doesn't affect which products we recommend.
Best Budget Vertical Mouse for Carpal Tunnel Relief
If your wrist throbs by 3 p.m. and you’ve been told a vertical mouse might help, the good news is you don’t need to spend big to test that theory. Several budget vertical mice deliver the same handshake-grip wrist position that the premium models offer — the differences are mostly in build quality, click feel, and battery life. Below, I’ll walk through what actually matters for carpal tunnel relief, then break down picks for different hands, hand sizes, and budgets.
Why a vertical mouse can help carpal tunnel pain
A standard mouse forces your forearm into pronation — palm-down, with the two bones in your forearm crossed. Hold that position eight hours a day and you compress the carpal tunnel from above. A vertical mouse rotates your hand into a “handshake” neutral position, typically between 45° and 90°, which reduces pressure on the median nerve.
This isn’t marketing fluff. Per clinician-authored summaries on sites like the Mayo Clinic and occupational therapy journals, neutral wrist posture is the single most-cited intervention for repetitive strain at the desk. Long-running threads on r/ergonomics consistently report that switching to a vertical mouse provides noticeable relief within one to three weeks for users with mild-to-moderate symptoms — though it’s worth saying clearly: a mouse alone won’t fix advanced carpal tunnel syndrome. If you’ve got numbness that wakes you up at night, see a doctor.
That said, for the millions of people with early or work-aggravated symptoms, swapping to a vertical mouse is one of the cheapest ergonomic upgrades you can make.
What to look for in a budget vertical mouse
Not every vertical mouse is created equal, and the cheapest ones cut corners in ways that matter. Here’s what actually moves the needle:
Angle. Ergonomic reviews (including clinician guidance from sources like the Mayo Clinic referenced above) generally point to the 50–70° range as the comfortable sweet spot. Fully 90° verticals (sometimes called “joystick” mice) look dramatic but can feel awkward and tire your shoulder. The Logitech MX Vertical’s angle sits near the middle of that range and is widely cited as comfortable.
Size matched to your hand. Measure from the base of your palm to the tip of your middle finger. Under 17 cm = small; 17–19 cm = medium; over 19 cm = large. A vertical mouse you have to stretch for will undo the ergonomic benefit.
Thumb rest. A scooped thumb rest keeps your thumb relaxed instead of clenched. Cheap mice often have a flat side that forces a pinch grip — defeating the purpose.
Button placement. Click buttons should fall under your fingertips without curling. Per aggregated Amazon owner reviews, this is the most common complaint about sub-budget verticals: buttons sit too far forward.
Wired vs. wireless. Wireless adds convenience but introduces latency and battery anxiety. For a daily driver, I prefer 2.4 GHz USB dongles over Bluetooth-only — fewer pairing headaches.
Adjustable DPI. Look for at least a 800/1200/1600 DPI toggle. Lower DPI = bigger arm movements (good for forearm activation), higher DPI = smaller wrist twitches (bad for symptoms).
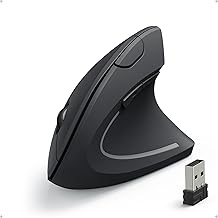
The Anker is the gateway drug of vertical mice. It’s deeply budget-friendly and, based on aggregated Amazon owner reviews stretching back several years, it’s the model most people use to figure out whether vertical mousing is going to work for them at all.
Pros: 90° handshake grip, 2.4 GHz dongle (no Bluetooth pairing), three DPI levels, runs on AA batteries that most owners report lasting several months. Cons: the build is plasticky, the scroll wheel feels mushy, and the 90° angle is steeper than ergonomists generally recommend. If you find it’s right for you, consider it a stepping stone — not a five-year mouse.
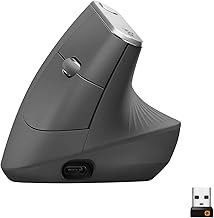
The MX Vertical lives at the top of the budget tier (sometimes called the “lower premium” segment depending on sale pricing). Logitech lists it on the official MX Vertical product page as having a 57° angle, Bluetooth and USB-receiver connectivity, USB-C charging, and up to four months of battery life per full charge in typical use — confirm the current figures on Logitech’s product page before buying, as specs can change between revisions.
It’s the model most often recommended in r/ergonomics threads for people who already know they want a vertical and want one that lasts. The build is genuinely good — rubberized texture, satisfying clicks, real scroll wheel. If your hand is medium or large, this is the one.
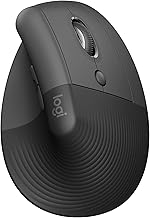
The Lift is essentially the MX Vertical’s smaller sibling. Per Logitech’s own positioning, it’s targeted at small-to-medium hands. Owner reports consistently highlight two things: the quieter “silent” click switches and the fact that it actually comes in a dedicated left-handed version (rather than expecting lefties to just deal).
If you’ve tried a full-size vertical and felt your fingers stretching to reach the buttons, the Lift is the budget answer.
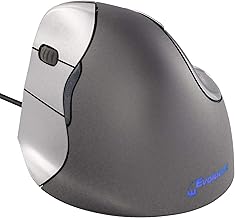
Evoluent has been making vertical mice longer than most companies have been making mice at all. The VerticalMouse C sits in the mid-range tier, and the left-handed version is genuinely engineered as a left-handed mouse — not a flipped right-handed shell. Per Evoluent’s product literature and long-running reviews on ergonomics blogs, the angle hovers around 70°.
It’s wired, which some readers will hate and others (including me, when latency matters) will appreciate. Build quality is reportedly excellent, with most owners getting 4+ years of daily use.
The Delux M618 family is the budget enthusiast’s pick. Per the manufacturer spec sheet, the M618 Plus offers up to 4000 DPI and a higher polling rate than most vertical mice in its tier, which matters if you do any photo editing, light gaming, or fast cursor work. It’s wired, which keeps the price down.
Owner reviews on Amazon and tech-forum threads consistently rate the build above its price point, though the software is reportedly clunky on macOS. For Windows users who want vertical ergonomics without giving up performance, this is the value pick.
How to actually set up your vertical mouse
A vertical mouse on its own won’t save you. The setup matters as much as the mouse:
Lower your DPI for the first week. Force yourself to use bigger arm movements rather than wrist flicks. This retrains your muscle memory.
Move the mouse closer to your keyboard. A long reach to the right makes you abduct your shoulder, which radiates back into the wrist. A Mechanical vs Membrane Keyboard: Which Reduces Wrist Strain? discussion gets into how a tenkeyless keyboard helps with this.
Drop your desk or raise your chair. Your elbow should sit at roughly 90–100° with your forearm parallel to the floor. If your wrists angle up to reach the mouse, no mouse shape will save you. A Affordable Desk Risers and Converters for Ergonomics can help here.
Take the first week slow. Per long-running r/ergonomics threads, most people experience a brief adjustment period of mild forearm soreness as different muscles activate. This typically fades within 5–10 days. If pain gets worse, stop and reassess.
Skip the wrist rest under the mouse. A wrist rest pins your wrist down, concentrating pressure exactly where you don’t want it. The whole point of vertical mousing is that your hand floats. (Wrist rests for keyboards are a different conversation — see Ergonomic Keyboard Wrist Rest: Do They Actually Help?.)
Common mistakes that undo the benefit
Even the best vertical mouse won’t help if you make these errors:
Death-gripping it. Per recurring complaints in r/ergonomics threads and owner reviews, many new users squeeze the mouse like a stress ball. Loose grip, fingers resting, thumb relaxed.
Cranking up the DPI to compensate. Based on owner feedback across Amazon and ergonomics forums, this is a common first-week habit that brings the wrist twitching right back. Keep DPI moderate and use your forearm.
Mousing on a too-high desk. Vertical mouse won’t compensate for a workstation that’s two inches too tall.
Ignoring the rest of the chain. Carpal tunnel symptoms often start with neck and shoulder tension. A bad chair and a craned neck filter all the way down to your wrist. If you’re rebuilding the workstation, the Budget Ergonomic Home Office Setup Under $500: Complete Guide covers the whole chain.
FAQ
Will a vertical mouse fix advanced carpal tunnel syndrome?
No. If you have numbness that wakes you up at night, constant thumb-and-index weakness, or loss of grip strength, that’s beyond what a mouse change addresses. A vertical mouse helps early and work-aggravated cases by reducing pronation and median nerve pressure, but advanced cases typically need clinical evaluation — splinting, steroid injections, or in some cases release surgery. Use a vertical mouse alongside, not instead of, treatment.
Can I use a vertical mouse alongside a laptop trackpad?
Yes, and a lot of hybrid-setup users do exactly this. Plug the vertical mouse in for heavy cursor work and fall back to the trackpad for quick scrolling or travel. The one thing to watch: if the trackpad sits lower than the mouse, your wrist drops and angles up to reach it, which reintroduces extension strain. Either use an external keyboard so the laptop can be raised to eye level, or commit to the mouse for longer sessions.
Is 57° or 90° better?
Most ergonomists recommend the 50–70° range. A full 90° angle puts your hand in a true handshake but can fatigue the shoulder and forearm, and the cursor control gets less precise. Start with around 60° if you’re new.
Can I use a vertical mouse for gaming?
For slower-paced games — strategy, sims, MMOs, most single-player RPGs — a vertical mouse works fine, and the Delux M618 Plus in particular has the DPI and polling rate to keep up. For twitchy competitive FPS play, most vertical mice fall short: the grip trades fine wrist-flick precision for forearm movement, which is the opposite of what aim mechanics reward. If gaming is a small part of your day and wrist relief is the priority, a vertical is the right call. If you’re ranked-grinding a