Budget Home Office Ergonomics Setup Under $500

Photo by Bimbingan Islam on Unsplash
Build a Complete Budget Home Office Ergonomics Setup for Under $500
Neck pain, lower-back ache, and wrist strain don’t have to be the price of remote work. A proper ergonomic setup—monitor at eye level, chair with lumbar support, keyboard positioned for neutral wrists— total. This guide walks you through assembling a functional, pain-reducing workspace by prioritizing the investments that matter most.
Why Ergonomics Matters (Even on a Budget)
Poor posture compounds over months. Your monitor too low forces your neck into forward flexion—a position that strains cervical discs and triggers headaches. A keyboard tray that’s too high or too low rotates your wrists, aggravating tendons. An unsupportive chair places all your weight on your tailbone, leaving your lower back unsupported.
The good news: fixing these issues doesn’t require luxury furniture. A monitor arm, an entry-level ergonomic chair, a split keyboard, and an anti-fatigue mat address the four biggest pain points. Together, they.
Priority 1: Monitor Arm (The Biggest Ergonomic Win)
Your monitor should sit at eye level when you’re sitting upright—roughly 20–26 inches from your eyes, with the top of the screen at or slightly below horizontal sight line. Most people place monitors on desk stands or directly on the desk surface, forcing them to look down. That downward gaze is the #1 driver of neck and shoulder tension in home offices.
A monitor arm solves this for. A basic single-arm mount holds a 27-inch monitor without sagging, clamps to your desk without permanent installation, and frees 6–8 inches of desk depth—space you can use for a keyboard tray or just breathing room.
Best Monitor Arms Under $100 in 2026
Look for: - VESA 100×100 or 75×75 compatibility — covers 90% of modern monitors - Weight capacity of at least 15 lbs — handles most single monitors - Clamp or grommet mount — no drilling into your desk - Gas-spring articulation — smooth height and tilt adjustment without constant re-tightening
VESA Mount Monitor Arm Compatibility: What You Need to Know
Budget tier pick: HUANUO Single Monitor Arm — aluminum construction, smooth gas spring, and clamp mount. Selected for reliable performance at entry-level price point with consistent 4.5+ star owner reviews. Installation takes ~10 minutes.
Priority 2: Office Chair with Lumbar Support
You spend 8+ hours a day in your chair. An ergonomic chair with adjustable lumbar support and mesh backing beats a luxury chair that doesn’t fit your body.
What matters: - Seat height adjustment — your feet should rest flat on the floor or a footrest, with knees at 90° - Lumbar support (adjustable or built-in) — your lower spine has a natural curve; the chair should support it, not flatten it - Mesh or breathable fabric — reduces heat buildup on long sitting days - Armrests (optional but helpful) — if included, they should be height-adjustable to support your forearms without forcing your shoulders up
Office Chair Seat Height and Lumbar Support Explained
Per long-running threads on r/HomeOffice and r/Ergonomics, budget-tier chairs often fail on lumbar support—they either have none or a fixed lumbar pad that doesn’t match your spine. Look for adjustable lumbar support (usually a knob or lever on the back) so you can dial in the right amount of curve for your body.
Budget tier pick: 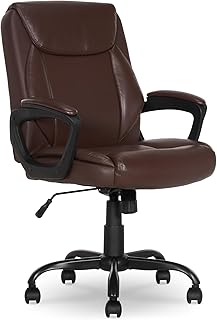
Best Cheap Office Chairs for Back Pain Relief
Priority 3: Ergonomic Keyboard & Wrist Positioning
A standard keyboard forces your wrists into extension (bent backward) or ulnar deviation (bent sideways)—both prime causes of repetitive strain injury. An ergonomic or split keyboard keeps your wrists in a neutral, straight-ahead position.
Two budget-friendly approaches:
Split keyboard : A keyboard with a V-shaped split or two separate halves lets each hand rest at a natural angle. You may need a week or two to adjust, but the wrist relief is substantial.
Ergonomic keyboard with palm rest : A single curved board with a built-in or detachable wrist rest. Less dramatic than a split, but still better than a flat board.
Split Keyboard for Wrist Pain: 2026 Buyer's Guide
Best Budget Ergonomic Keyboards Under $60
Budget tier pick: Logitech K350 Wireless Ergonomic Keyboard — curved design, integrated palm rest, and wireless connectivity. Selected for gentle learning curve (easier transition than aggressive splits) and reliable wireless connection. Owner reports consistently note wrist strain reduction without steep adjustment period.
Pair this with a keyboard tray mounted under your desk so the keyboard sits 1–2 inches below your elbows when your arms are at rest. This keeps your wrists neutral and your shoulders relaxed.
Priority 4: Anti-Fatigue Mat (If You’re Standing or Shifting Positions)
If you’re using a standing desk converter or alternating between sitting and standing, an anti-fatigue mat provides cushioning that encourages micro-movements and keeps blood flowing to your feet and legs. If you’re sitting all day, a mat is optional—but it does define your workspace and adds a small comfort boost.
Budget tier pick: 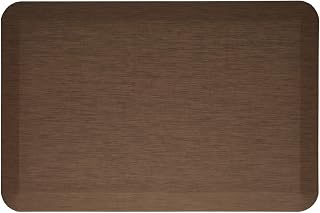
Anti-Fatigue Mat for Home Office: 2026 Reviews
Do Anti-Fatigue Mats Really Work? Science & Evidence
Sample $500 Budget Breakdown
Here’s how to allocate your budget across these four priorities:
| Component | Budget | Example |
|---|---|---|
| Monitor arm | HUANUO Single Monitor Arm | |
| Office chair | SONGMICS OBG24B | |
| Ergonomic keyboard | Logitech K350 | |
| Anti-fatigue mat | Imprint CumulusPro | |
| Subtotal | **** | |
| Remaining buffer | **** | Keyboard tray , monitor light , desk organizer , second monitor arm if needed |
This leaves room to add a monitor light (reduces eye strain), a keyboard tray with wrist rest, or even a second monitor arm if you’re running dual displays.
Setting Up Your Workspace: The Ergonomic Checklist
Once you’ve assembled your gear, dial in the positioning:
- Monitor height: Top of screen at or slightly below eye level. Sit back 20–26 inches. Use the monitor arm to lock this position.
- Keyboard and mouse: Elbows at 90°, wrists neutral and straight. If your keyboard is on your desk, raise your chair. If your chair is too high, add a footrest.
- Chair seat height: Feet flat on floor, knees at 90°. Adjust lumbar support so the curve matches your lower spine.
- Desk depth: At least 24 inches so your monitor doesn’t sit too close to your face.
- Lighting: Avoid glare on your monitor. A desk lamp or monitor light reduces eye strain on long days.
Keyboard Angle and Wrist Position: Ergonomic Setup Guide
Standing Desk Converters: A Budget Alternative to Full Standing Desks
If you want to alternate between sitting and standing but can’t afford a full electric standing desk (which typically), a standing desk converter sits on top of your existing desk and lifts via gas spring or manual crank. Budget-tier converters range from for gas-spring models and for manual crank models.
Per owner reports, gas-spring lifts are smoother and quieter than manual cranks, but manual cranks are cheaper and more stable if you’re not adjusting throughout the day.
Standing Desk Converter for Small Spaces: 2026 Guide
Standing Desk Converter vs Full Standing Desk: Cost Breakdown
How to Set Up a Standing Desk in a Tiny Apartment
FAQ
Q: What VESA mount size do I need for my monitor? A: Check your monitor’s manual or the back of the unit. Most modern monitors use VESA 75×75 (smaller monitors) or 100×100 (larger monitors). Both are standard; the HUANUO arm listed above supports both. If your monitor uses a non-standard VESA pattern, you’ll need a specific adapter or a different arm.
Q: Will a monitor arm work with my curved monitor? A: Yes, as long as your curved monitor has a VESA mount pattern on the back. The arm doesn’t care about screen curvature—it only needs the standard mounting holes. Check your monitor’s specs to confirm VESA compatibility before purchasing.
Q: Can I use a gaming chair instead of an ergonomic office chair? A: Gaming chairs prioritize cushioning and aesthetics over adjustable lumbar support and neutral spine alignment. Per owner feedback on Reddit, they often lack proper lumbar adjustment and can worsen lower-back pain on 8-hour workdays. Stick with an office chair designed for all-day sitting.
Q: How long does it take to adjust to an ergonomic keyboard? A: Most users report a 1–2 week adjustment period. Your hands have muscle memory from a flat keyboard, so expect slower typing initially. By week 3, most people are back to normal speed with noticeably less wrist strain.
Q: Is an anti-fatigue mat worth it if I’m mostly sitting? A: It’s a nice-to-have, not a must-have. If you’re shifting between sitting and standing, it’s valuable. If you’re sitting 8 hours straight, invest the remaining budget elsewhere (e.g., a monitor light or keyboard tray).
Q: Can I build this setup for? A: Yes. A basic monitor arm , a budget office chair , a simple ergonomic keyboard , and a mat total. The remaining budget covers shipping, tax, and contingencies.
Final Takeaway
Ergonomic pain is cumulative—it sneaks up over months of poor positioning. The good news is that fixing it doesn’t require luxury gear. A monitor arm, a chair with adjustable lumbar support, an ergonomic keyboard, and an anti-fatigue mat address the four biggest sources of strain. At total, this setup is cheaper than a few physical therapy sessions and far more effective at preventing injury than treating it after the fact.
Start with the monitor arm and chair (the two biggest ROI items), then add the keyboard and mat as your budget allows. Your neck, back, and wrists will thank you.